Events
Events are the primary way to interact with any client connected to Mercury (skills, browsers, apps, Raspberry Pi’s, etc.).
There are 2 categories of events in the platform:
- Core events. These are built into Mercury. No setup or install required (but you may not have permission to use them).
- Registered events: These are custom events that skills define and register.
Given our ideological stance of “Small Trunk, Big Branches”, most of the functionality you in your Theatre will be provided by registered events.
Types of events
There are 3 types of events:
- Command: These events are commands to a client to do something. These are similary to HTTP POST/GET/PUT/DELETE requests in behavior.
- Reactive: These are to signify something happened somewhere in the platform. They well start with the word
did-. Example:did-login,appointments.did-book-appointment. - Preemptive: These are to signify something is about to happen. They will start with the word
will-. Example:will-login,appointments.will-book-appointment. This is a common place to cancel a command.
Anatomy of an Event’s Name
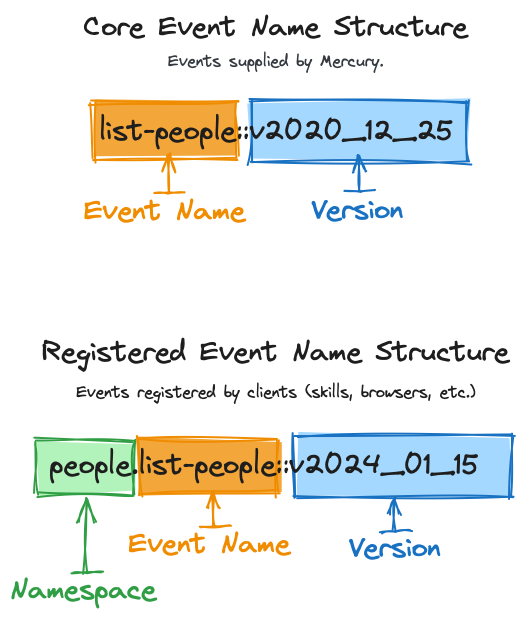
There are 3 parts to an event’s name:
- Namespace: This is the namespace of the skill or client that registered the event. Core events do not have a namespace. When a skill is registered with Mercury, it will get to choose its namespace.
- Event Name: The event name is the name of the event being sent. It is followed by a
::. - Version: The version is the version of the event being sent. It is the last part of the event’s name.
An event that is comprised of all 3 parts is called a Fully Qualified Event Name.

Anatomy of an Event
Events are very robust, especially when compared to standard verb based HTTP requests (and even other event based systems).
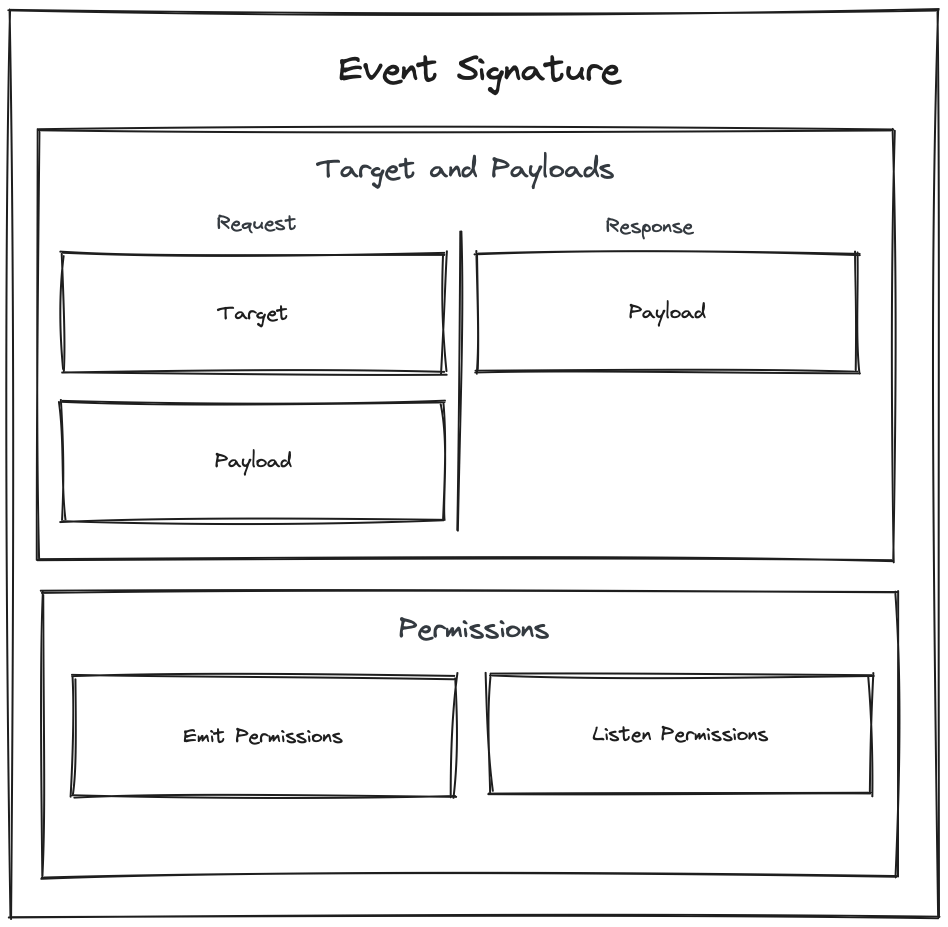
- Targets & Payloads
- Emit Target: This is where the event is going. It can be a skill, a location, a person, or something totally custom that your skill introduces.
- Emit Payload: This is the data that is being sent with the event.
- Response Payload: This is the data that is returned from a listener that handled the event.
- Permissions
- Emit Permissions: These are the permissions required to emit the event. By default, the skill that registered the event is the only one that can emit it.
- Listener Permissions: These are the permissions required to listen to the event. By default, the skill that registered the event is the only one that can listen to it.

Event Naming Conventions
Here are some common naming conventions for events (minus the namespace and version):
| Name Template | Examples | Use Case |
|---|---|---|
create-{objectSingular} | create-family-member, create-objective-profile | Creating a new thing. |
get-{objectSingular} | get-family, get-objective-profile | Retrieving a thing. |
list-{objectPlural} | list-family-members, list-objective-profiles | Listing multiple things (objects,records,etc.). |
update-{objectSingular} | update-family-member, update-objective-profile | Updating a thing. |
save-{objectSingular} | save-family-member, save-objective-profile | Updating a thing if it exists, creating if not. |
delete-{objectSingular} | delete-family-member, delete-objective-profile | Deleting a thing. |
Event File Structure
When you register an event as a skill (see “Registering an Event” below), the following files will be created:
>ls src/events/{eventName}/v2024_01_01

emitPayload.builder.ts
emitTarget.builder.ts
event.options.ts
responsePayload.builder.ts
Files:
- emitPayload.builder.ts: The schema of the payload that is sent when the event is emitted.
- emitTarget.builder.ts: The schema of the target that the event is being sent to.
- event.options.ts: Additional options for an event (including permissions).
- responsePayload.builder.ts: The schema of the payload that is returned when the event is handled.
Events & Faked Listeners
Registering an Event
Here is a quick breakdown on how to register an event. You won’t go about it this way in most circumstances, but it’ll get down to the fundamentals on how it works.
Note: In order to register an event, you’ll first need to register your skill with Mercury.
Test 1a: Create your test
Run the following code in your skill’s root directory:
spruce create.test
Test 1b: Emit your event
Your event has not been defined yet, but we need a failing test to get there!
import { AbstractSpruceFixtureTest } from '@sprucelabs/spruce-test-fixtures'
import { test, fake } from '@sprucelabs/test-utils'
import { vcAssert } from '@sprucelabs/heartwood-view-controllers'

@fake.login()
export default class RenderingADialogTest extends AbstractSpruceFixtureTest {

    @test()
    protected async rendersAlertOnLoad() {
        await this.fakeClient.emitAndFlattenResponses('my-skill::book-appointment::v1')
    }
}
Note: Do not worry about getting the version right. We’ll fix it after we define the event.
Production 1a: Create your event
Run the following code in your skill’s root directory:
spruce create.event
Production 1b: Define your event
Now is a great time to do some event design work. Finde Once your event is defined, make sure you run the following:
spruce sync.events

